Customizing the Appearance of Notifications in Swift
Let’s see the use of UNNotificationContentExtension and UNNotificationCategory.

In this article, we will see the following things:
- How to play a video in the push notification.
- How to modify the UI content of a push notification before displaying it to the user.
- How to add action buttons to perform certain tasks according to the notification.
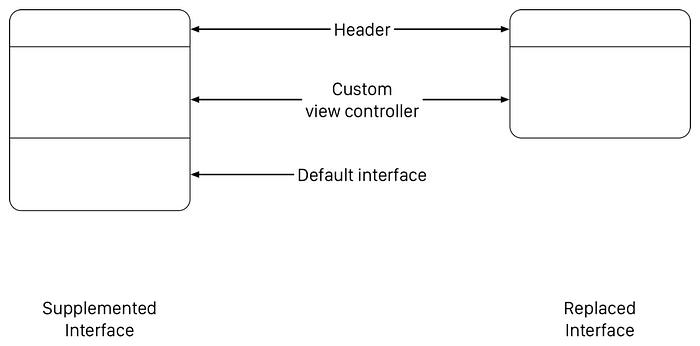
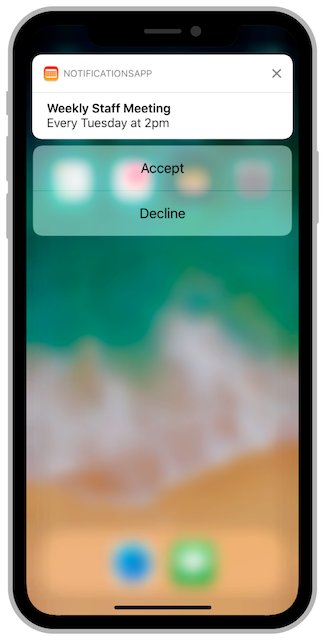
When an iOS device receives a notification containing an alert, the system displays the contents of the alert in two stages. Initially, it displays an abbreviated banner with the title, subtitle, and two to four lines of body text from the notification. If the user presses the abbreviated banner, iOS displays the full notification interface, including any notification-related actions. The system provides the interface for the abbreviated banner, but you can customize the full interface using a notification content app extension. Documentation

Let’s see how we can play a video in the notification.
This is how we can add an extension to an existing project:
File -> New -> Target -> Notification Content Extension

Note: After added the extension app into the project, extension’s bundle identifier may be like <main_app_identifier>.extension_name
For example, main app bundle identier: com.app.news and extension name is “NewsPlayerNotificationContentExtension” then extension’s identifier may be like “com.app.news.NewsPlayerNotificationContentExtension”.
Want to read this story later? Save it in Journal.
Before going forward into the extension app, make sure you configured with push notification in your main project. If not, just do it quickly these steps in the main app:
- Enable push notification in the section “Signing & Capabilities”.
- Write this code in the main app file called “AppDelegate”.

Now, go to the extension app and open the “MainInterface.storyboard” file, and here you can design your custom UI how exactly you want:

In the above example, I have added a UIView to add a player on it.
Important
You have to provide the extension category name with the extension’s info.plist file.
You may add more than one notification content app extension to your project, but each one must support a unique set of notification categories. You specify the categories for your app extension in its
Info.plistfile.
UNNotificationExtensionCategory: <category_name> (This will allows the system to select this extension for display)
UNNotificationExtensionUserInteractionEnabled: true (This will allows receiving the touch events from the users)
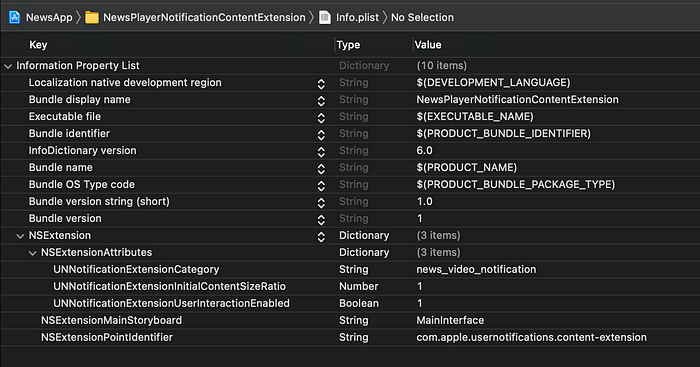
Note: Here UNNotificationExtensionCategory key is a type of String, which means it can have a single value. But you can add multiple categories also and set the key as Array. If a notification with either of those types arrives, the system displays the interface from this notification content app extension.
Hide default notification interface:
Set this key UNNotificationExtensionDefaultContentHidden with value true in extension’s info.plist file. In my case, I have not hidden the default interface.
Now just open the NotificationViewController.swift file in the extension app and write down the following code:

In the above code:
- You can set the content height according to your content.
- You have to parse the notification payload according to your JSON.
- You can get title, subtitle, body, and any other values from the payload in this method.
Yayyy…we have done all the coding part here now time to test it out. Before testing it I would like to mention the most important point i.e. don’t forget to add your extension category name into the notification payload.
For example, in my case, I set the category name as “news_video_notification” so I’m testing this on the simulator.
For testing the push notification on the simulator, check out this amazing article.
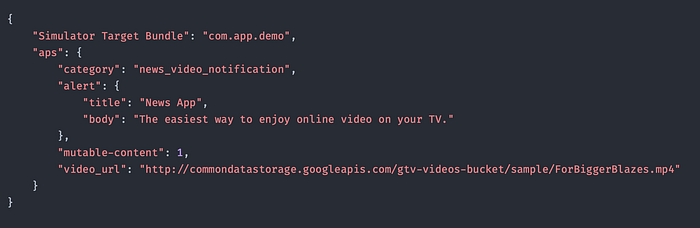
This is my notification payload to test it on the simulator.
The Result:
Once you run the main app, send the push notification and click on “View”:
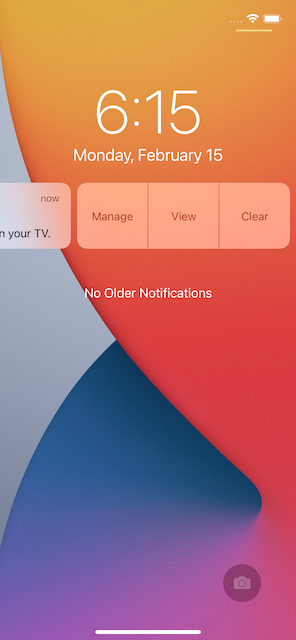
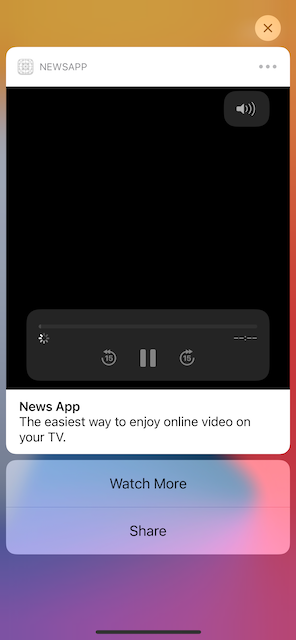
The video will be automatically play in the notification.
Additional Part
Now we will add some custom notification actions.
Now we will see how we can add action buttons to the notification interface. Documentation
In my above example, I have added two actions “Watch More” and “Share” for a video notification.
Write down this code in the AppDelegate’s function didFinishLaunchingWithOptions into the main app.
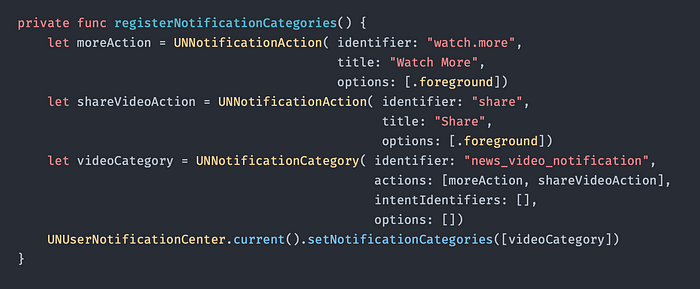
Note: Make sure, your category identifier should be matched your extension category with your need to display the action buttons.
Here, you can add more categories to add actions to your notification according to your need. But make sure about category identifier.
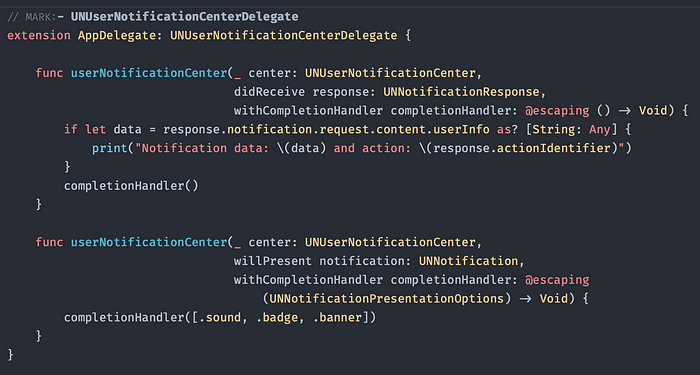
Once you click any action on notification, you will get an action identifier (response.actionIdentifier) in the above method. Here, you can perform an action according to the action identifier.
Helpful points:
- You can test content extension functionality on simulator. Might be video will not be play in notification extension on simulator.
- If you are not using any content extension in the app and you want to add action buttons, so still you have to add category_identifier in notification payload to identify the notification.
- If you have mutiple target in the app and you need to show same UI content for the notification, so you can set the same category identifier in all the content extensions.
Don’t forget to add a comment if you have any query.
Source Code: Github
Reference: Apple Documentation
Debug an extension: StackOverflow
I hope you have enjoyed this article. So,
- Follow me for more updates.
- Share this article to help other developers.
- Most important to claps on it because it motivates me to create more useful articles.
Check out my previous articles:
- JSON parsing with Codable
- Network Framework in iOS (Swift)
- Any Vs AnyObject in Swift
- Extended UIColor in Swift
- Spacing between each character in UILabel
Happy Coding !!
📝 Save this story in Journal.

